From Webhook to Production - Deploying a Real Event-Driven FastAPI Service
This research / project demonstrates how to build and deploy a simple event-driven webhook service using FastAPI, PostgreSQL, and Alembic, following patterns commonly used in real-world.
The main goal is to show how webhook-based integrations (such as payment providers) can be designed in a reliable, extensible, and observable way, without overengineering.
The service receives webhook events, persists them safely, and processes them asynchronously, allowing integrations with external systems while keeping the API responsive (e.g. Notion in this case)
Methodology:
- Webhook: receive the request and the API validates and persists data, then returns immediately.
- Asynchronous processing: external integrations are executed outside the request lifecycle.
- Storage First: act as a middleware layer between the client and target system.
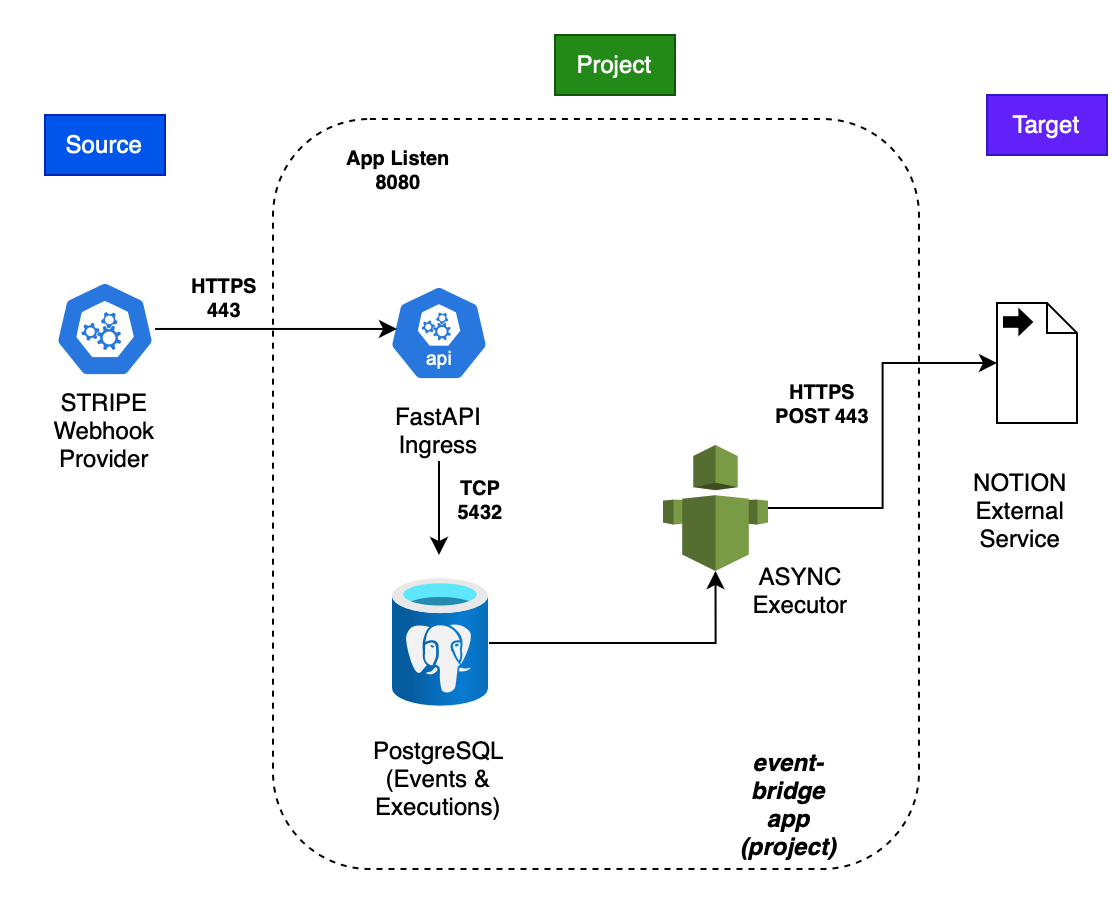
Architecture
The system follows a simple event-driven architecture:
Requirements
Runtime
•	Python 3.11

•	Docker

•	PostgreSQL
Python Dependencies
•	FastAPI

•	Uvicorn

•	SQLAlchemy (async)

•	Alembic

•	AsyncPG

•	HTTPX

•	Pydantic
External Services (optional for demo)
•	Stripe (webhook events)

•	Notion (as an example downstream integration)
Code Structure
eventbridge-api/
│
├── app/
│   ├── __init__.py
│   ├── main.py                 # FastAPI application entrypoint
│   ├── api/
│   │   └── v1/
│   │       ├── webhooks/        # Webhook endpoints
│   │       └── executions.py    # Retry & execution management endpoints
│   ├── core/
│   │   ├── __init__.py
│   │   └── config.py            # Environment & app configuration
│   ├── db/
│   │   ├── __init__.py
│   │   ├── database.py          # Async SQLAlchemy engine & session
│   │   ├── deps.py              # FastAPI DB dependencies
│   │   └── models.py            # ORM models (Event, Execution)
│   ├── log/
│   │   ├── __init__.py
│   │   └── logger_setup.py      # Application logging configuration
│   ├── services/
│   │   ├── __init__.py
│   │   ├── executor.py          # Background execution orchestration
│   │   └── notion/
│   │       ├── __init__.py
│   │       ├── executor_notion.py  # Notion-specific execution logic
│   │       └── notion_payments.py  # Notion API client & payload mapping
│   └── support/
│       ├── __init__.py
│       └── utils.py             # Shared helper utilities
├── migrations/
│   ├── env.py                   # Alembic migration environment
│   ├── script.py.mako
│   └── versions/                # Auto-generated DB migrations
├── docker-compose.yml           # Local development stack (API + Postgres)
├── Dockerfile                   # Production container image
├── alembic.ini                  # Alembic configuration
├── requirements.txt             # Python dependencies
├── .env                         # Local environment variables (gitignored)
├── .env-model                   # Environment variable template
├── .gitignore
├── README.md
└── LICENSE
Step by step (demo):
-
Please generate the keys for Notion API first: https://developers.notion.com
-
Also, create new account in Stripe (free tier).
.env
First of all, create the file .env in the repository to apply the credentials and load in the settings:
POSTGRES_DB=
POSTGRES_USER=
POSTGRES_PASSWORD=
POSTGRES_HOST=
POSTGRES_PORT=
POSTGRES_ASYNC_URL="postgresql+asyncpg://${POSTGRES_USER}:${POSTGRES_PASSWORD}@${POSTGRES_HOST}:${POSTGRES_PORT}/${POSTGRES_DB}"
NOTION_API_URL=
NOTION_API_KEY=
NOTION_DATABASE_ID=
POSTGRES_URL ="postgresql+psycopg2://${POSTGRES_USER}:${POSTGRES_PASSWORD}@${POSTGRES_HOST}:${POSTGRES_PORT}/${POSTGRES_DB}"
1. Generate the docker compose:
docker compose up -d
2. Create a virtual env and install dependencies:
python -m venv .venv
source .venv/bin/activate
pip install -r requirements.txt
3. Run Alembic to create database schema:
alembic upgrade head
4. Run App locally:
uvicorn app.main:app --reload
INFO:     Uvicorn running on http://127.0.0.1:8000 (Press CTRL+C to quit)
INFO:     Started reloader process [68720] using WatchFiles
{"time":"2026-01-31 17:48:20,665", "level":"INFO", "name":"uvicorn.error", "message":Started server process [68722]}
{"time":"2026-01-31 17:48:20,665", "level":"INFO", "name":"uvicorn.error", "message":Started server process [68722]}
{"time":"2026-01-31 17:48:20,665", "level":"INFO", "name":"uvicorn.error", "message":Waiting for application startup.}
{"time":"2026-01-31 17:48:20,665", "level":"INFO", "name":"uvicorn.error", "message":Waiting for application startup.}
{"time":"2026-01-31 17:48:20,666", "level":"INFO", "name":"uvicorn.error", "message":Application startup complete.}
{"time":"2026-01-31 17:48:20,666", "level":"INFO", "name":"uvicorn.error", "message":Application startup complete.}
5. Access Swagger UI:
http://localhost:8000/docs
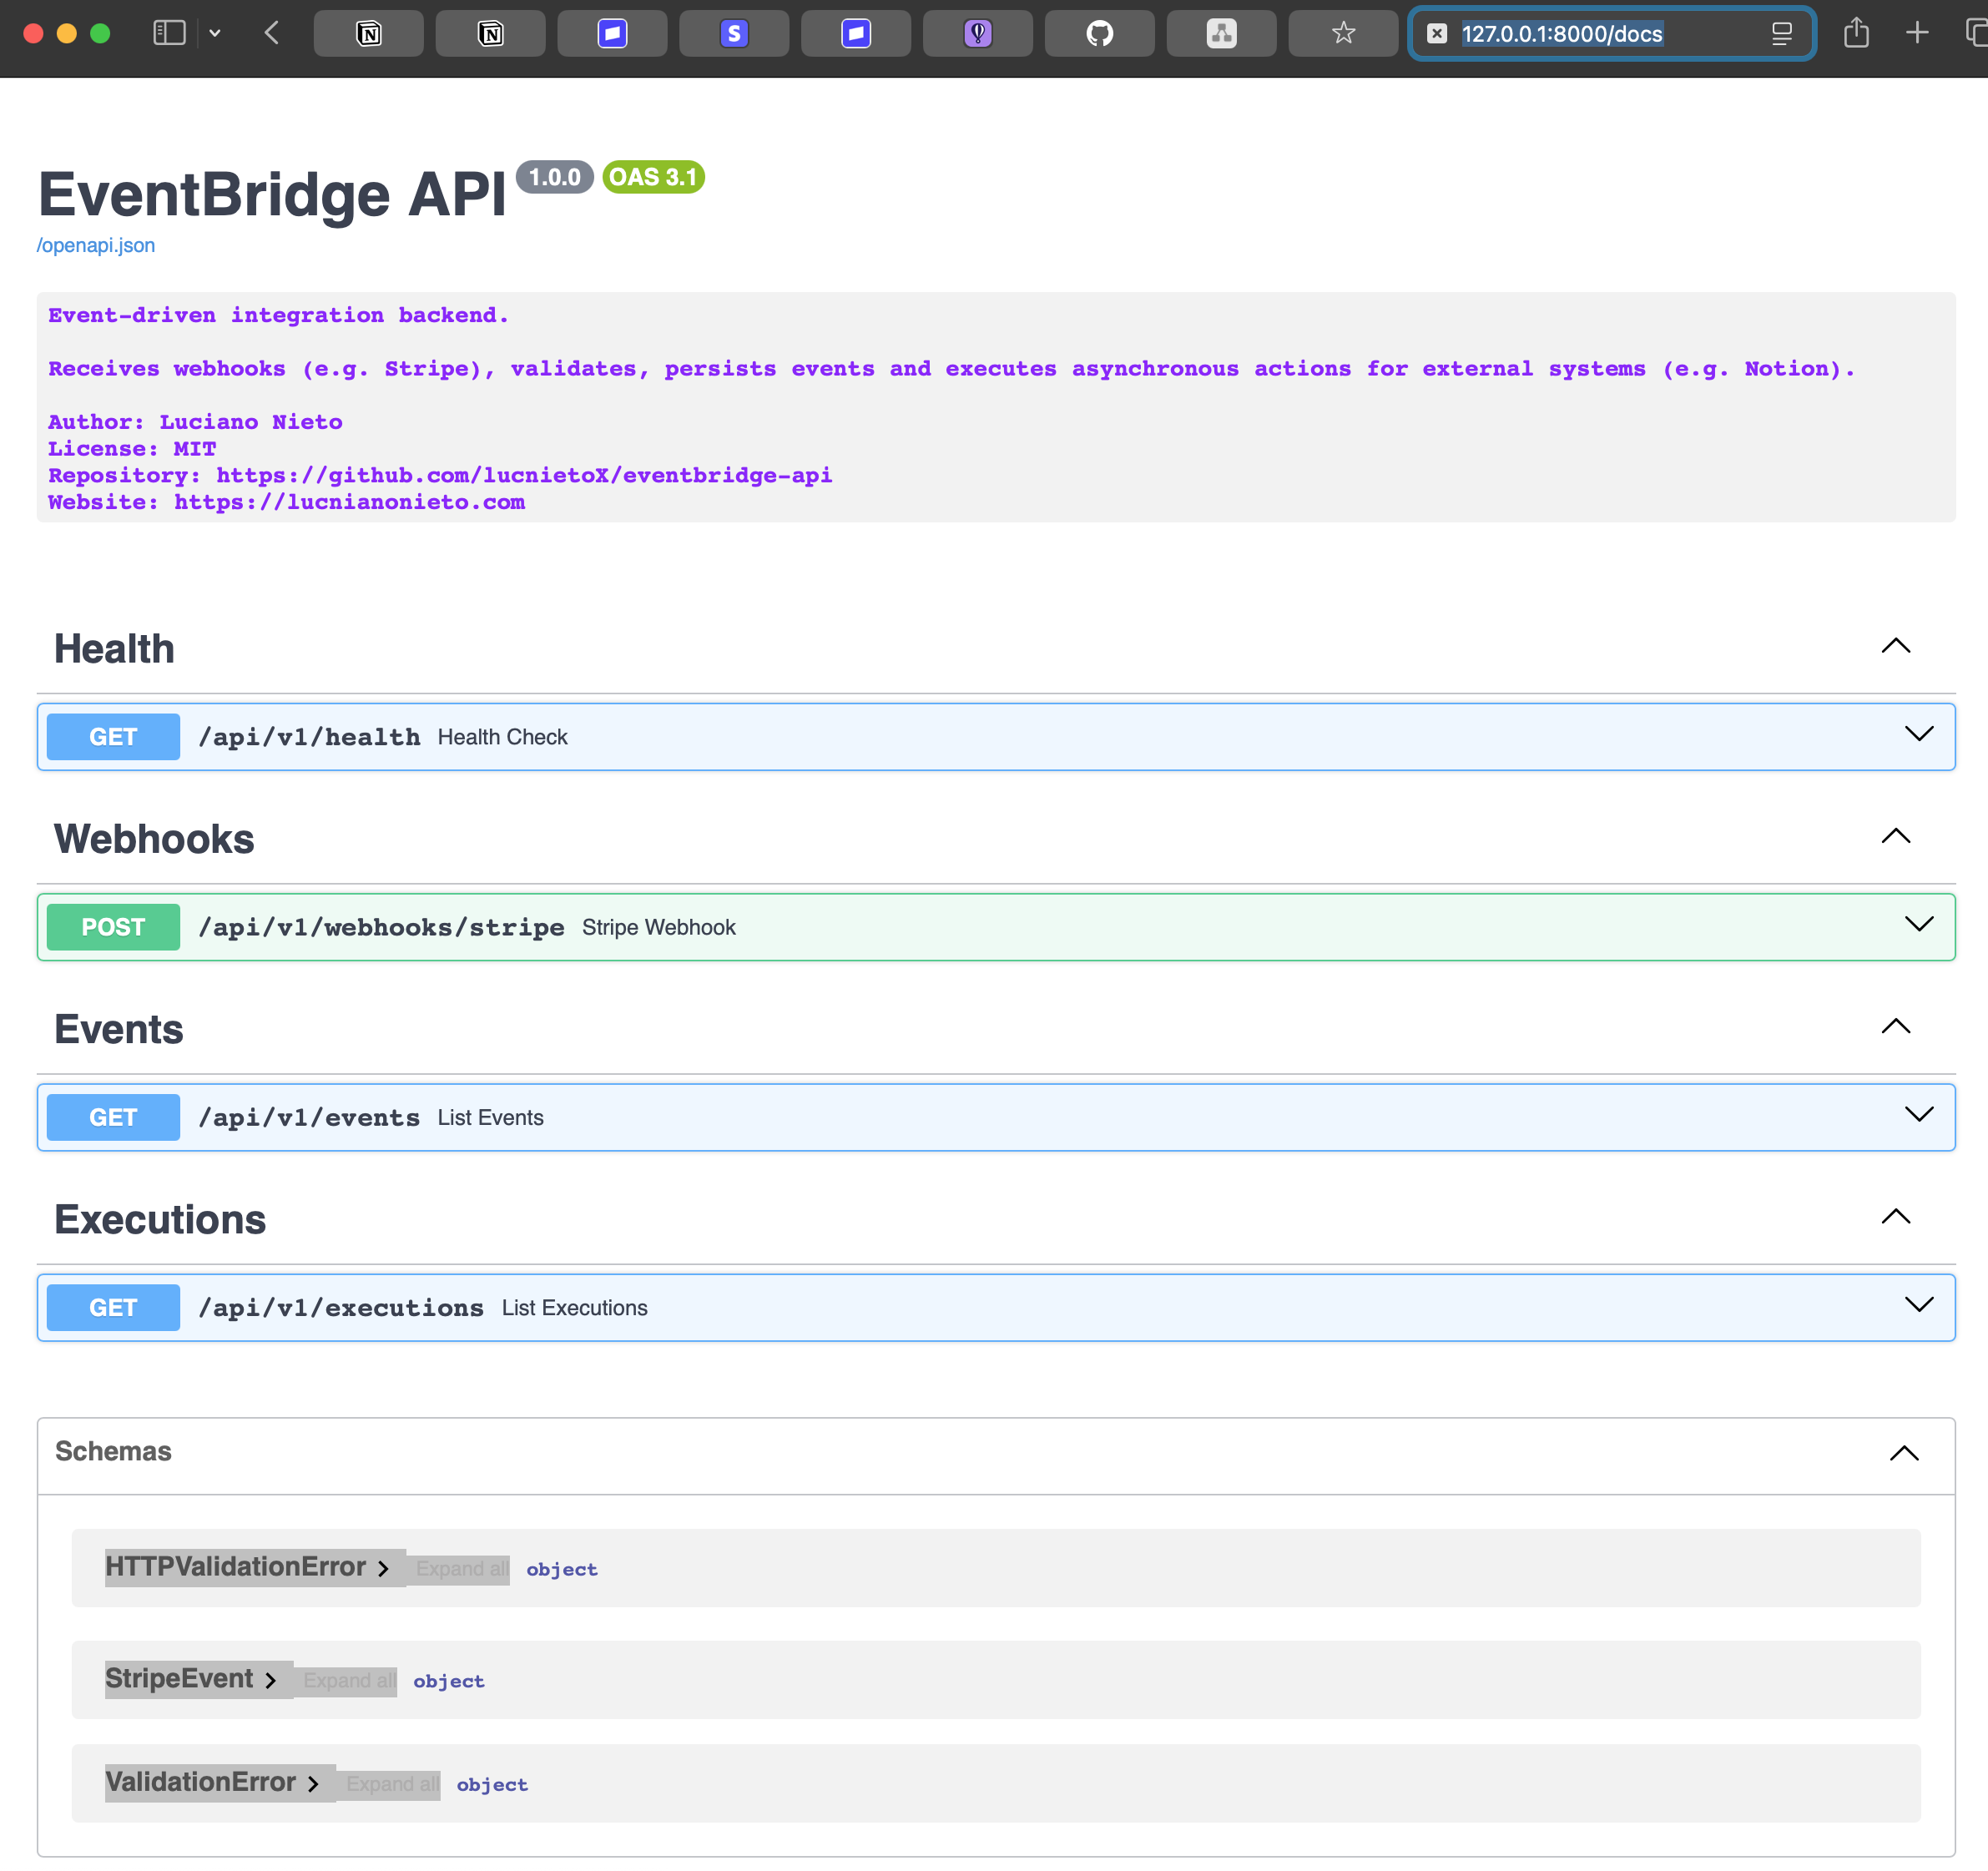
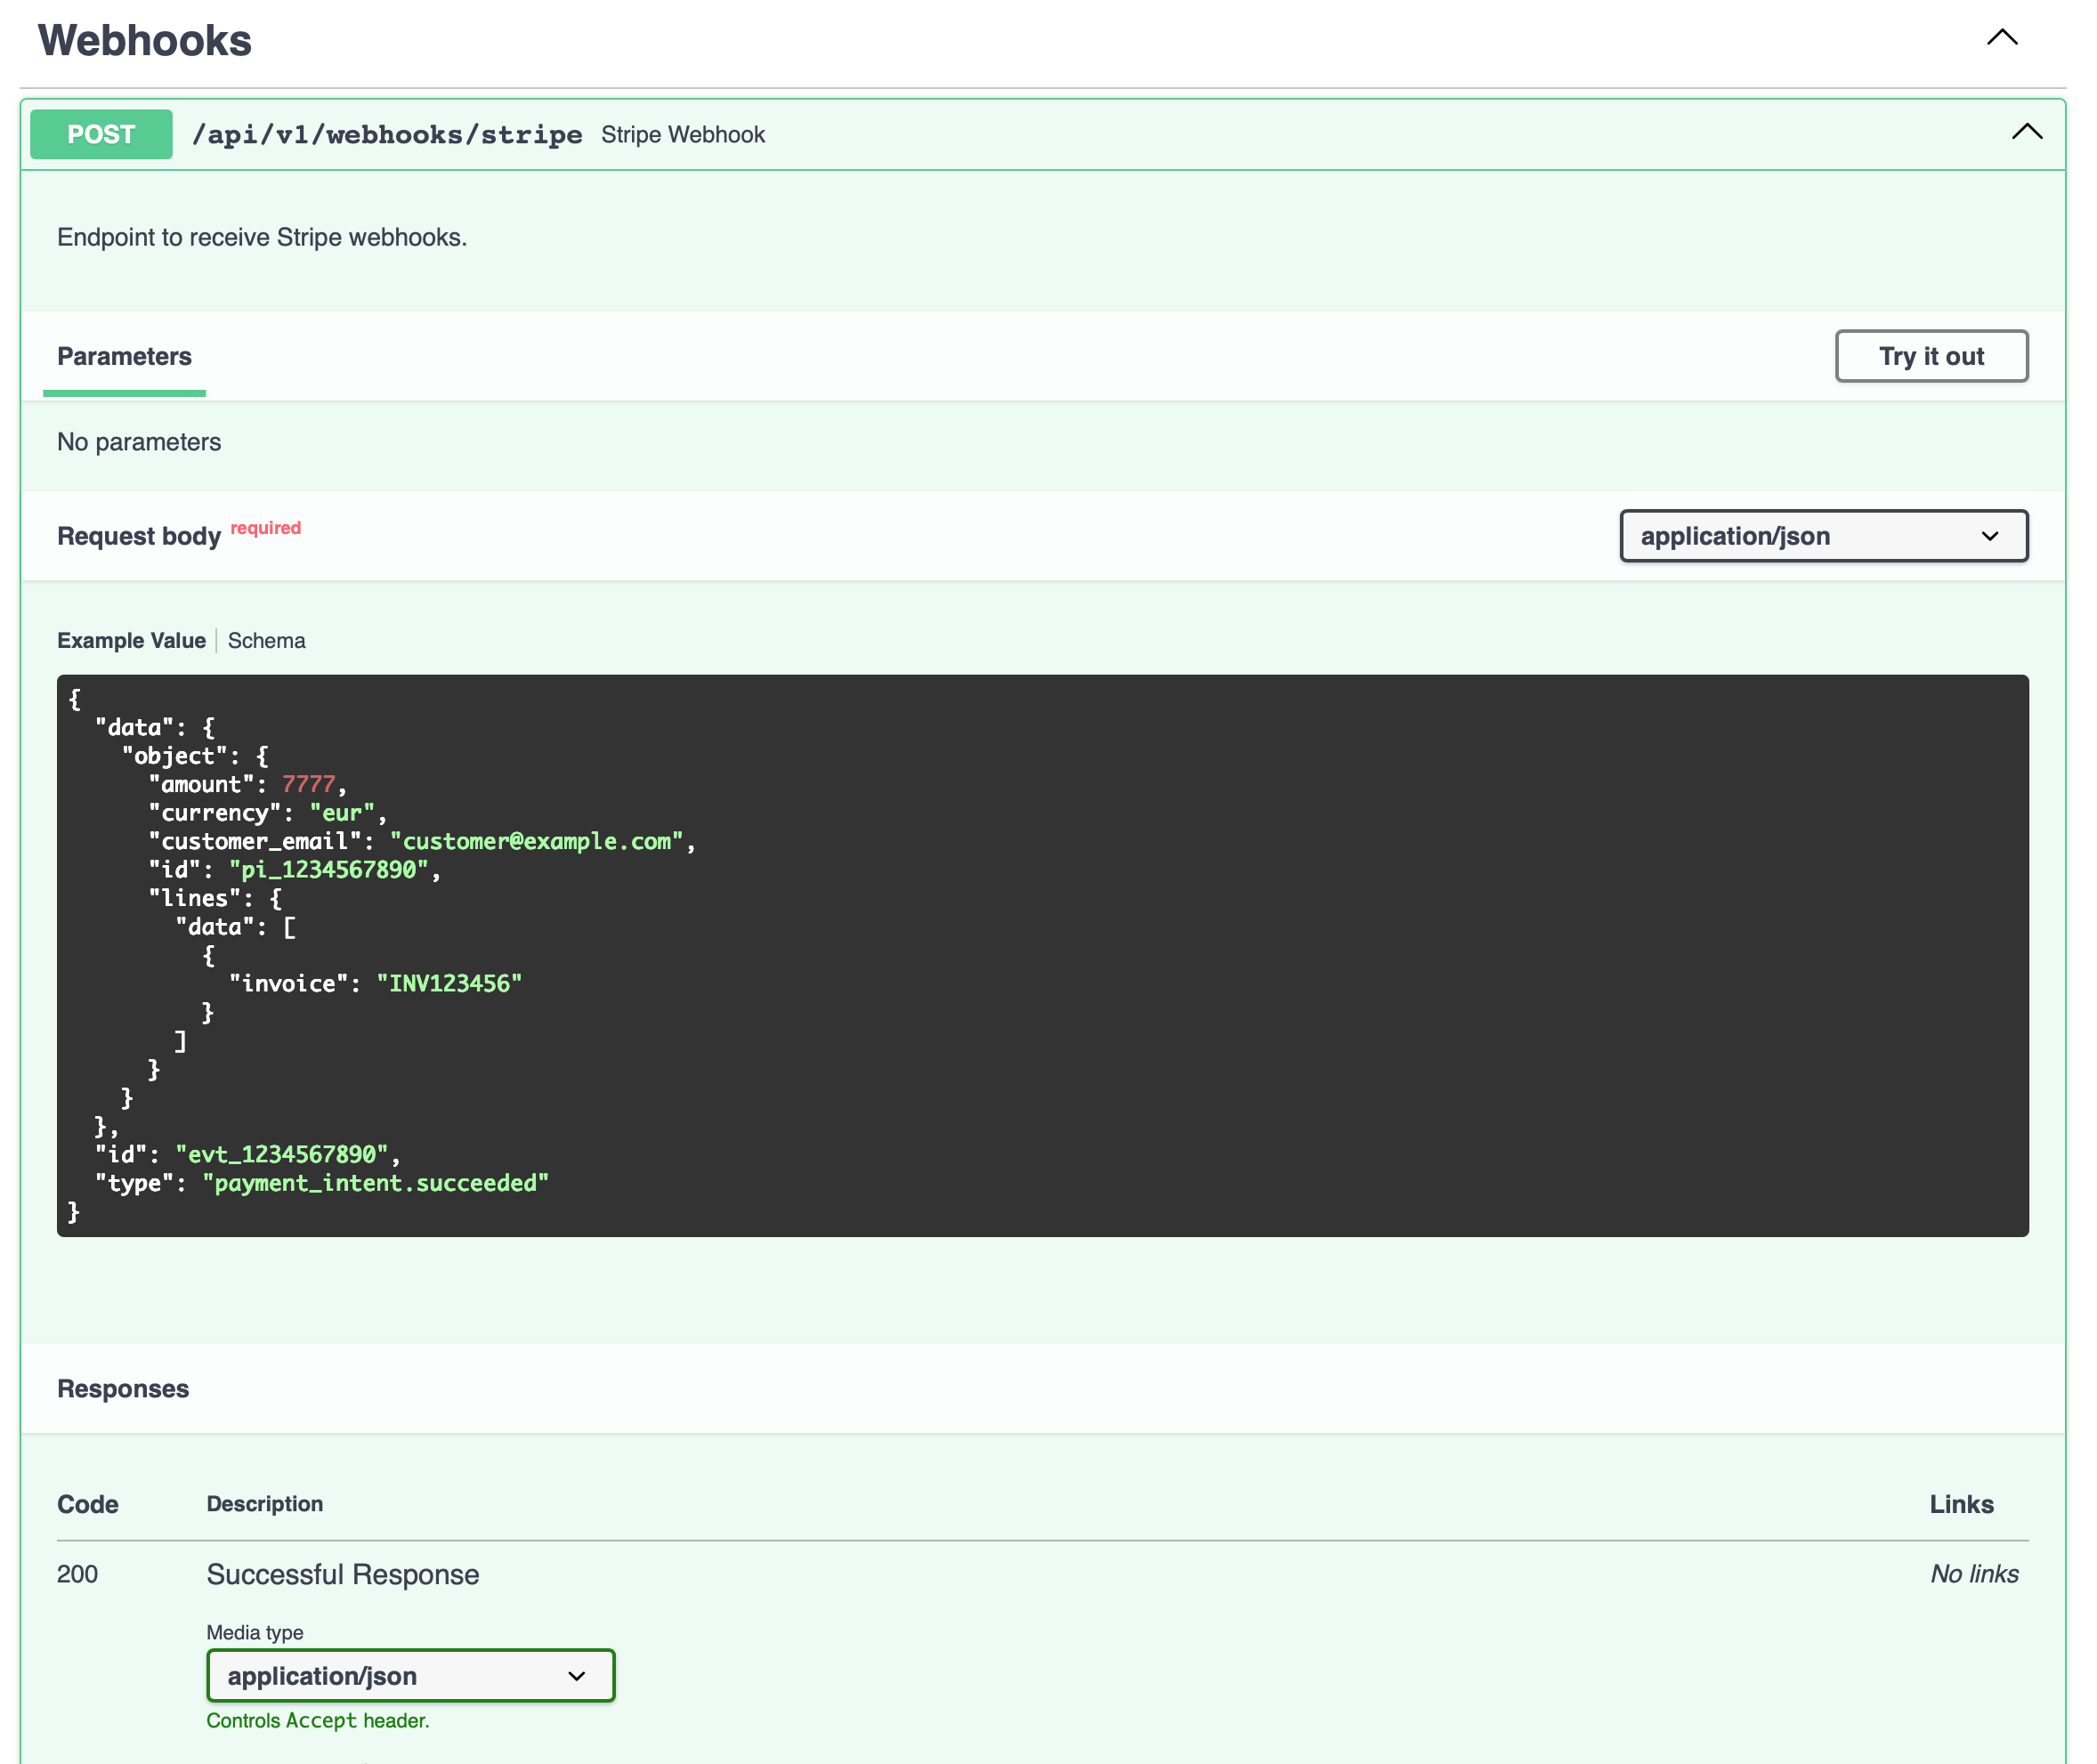
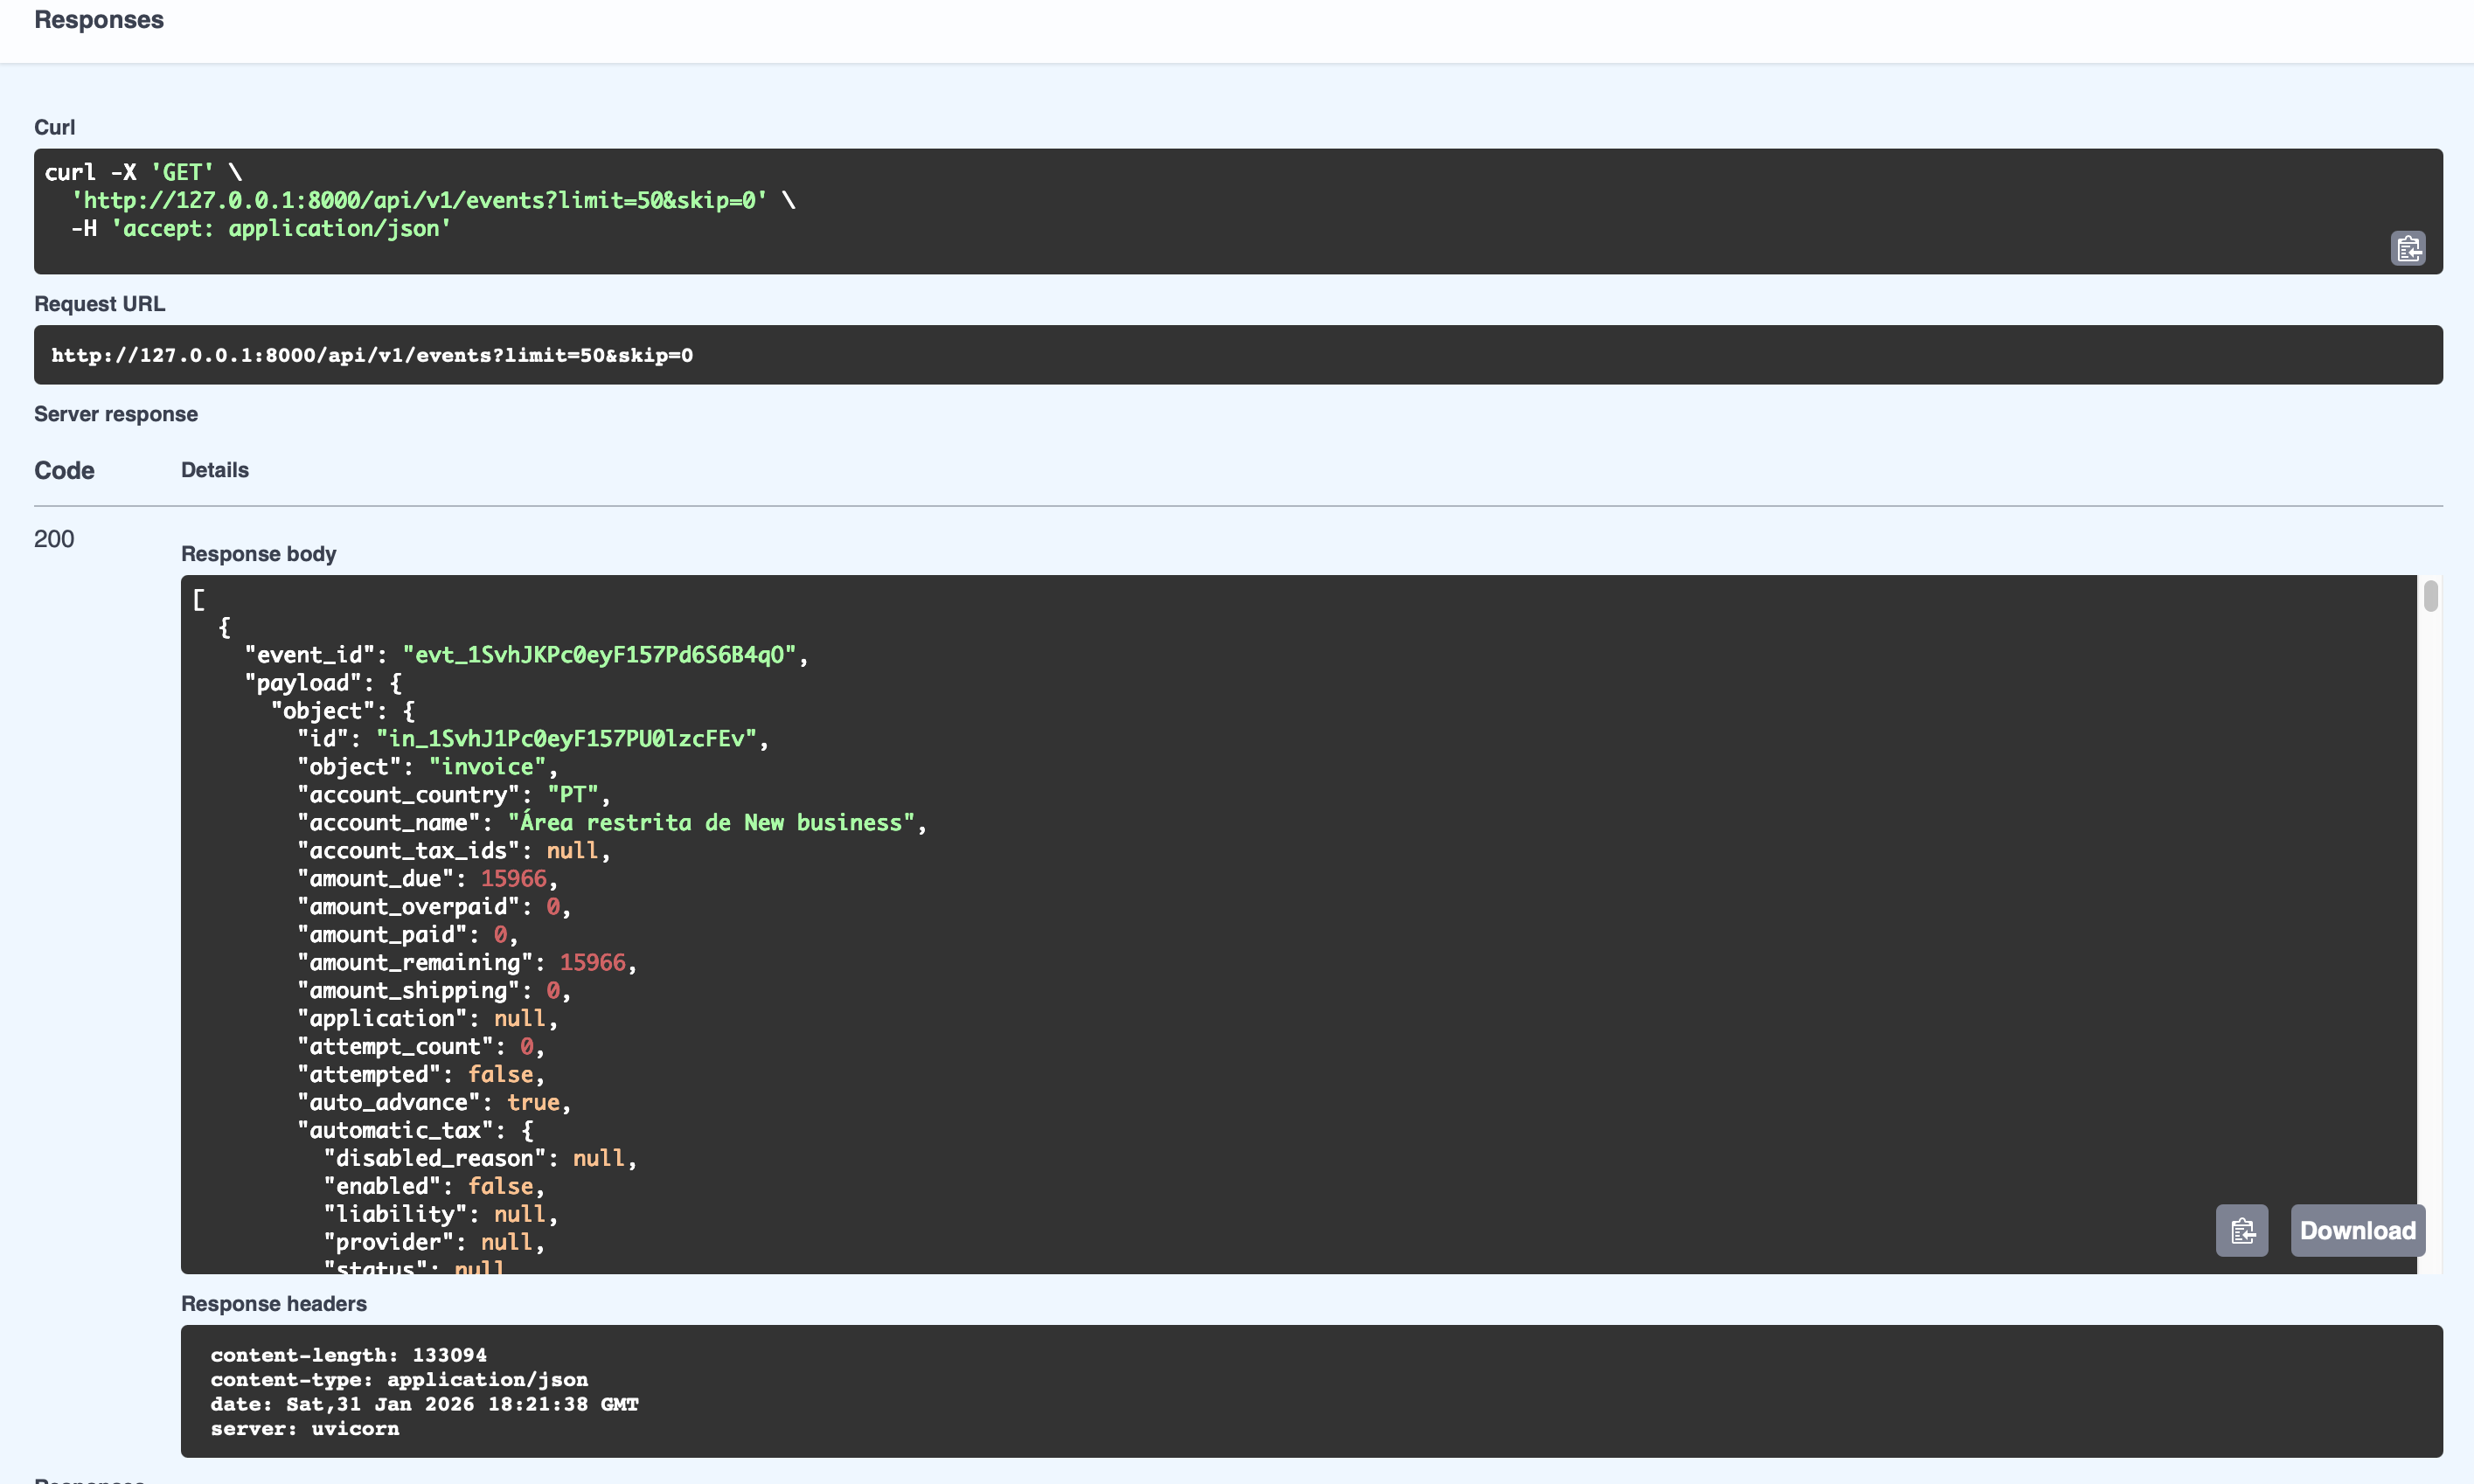
6. Play with the swagger with the example payload to simulate the webhook:
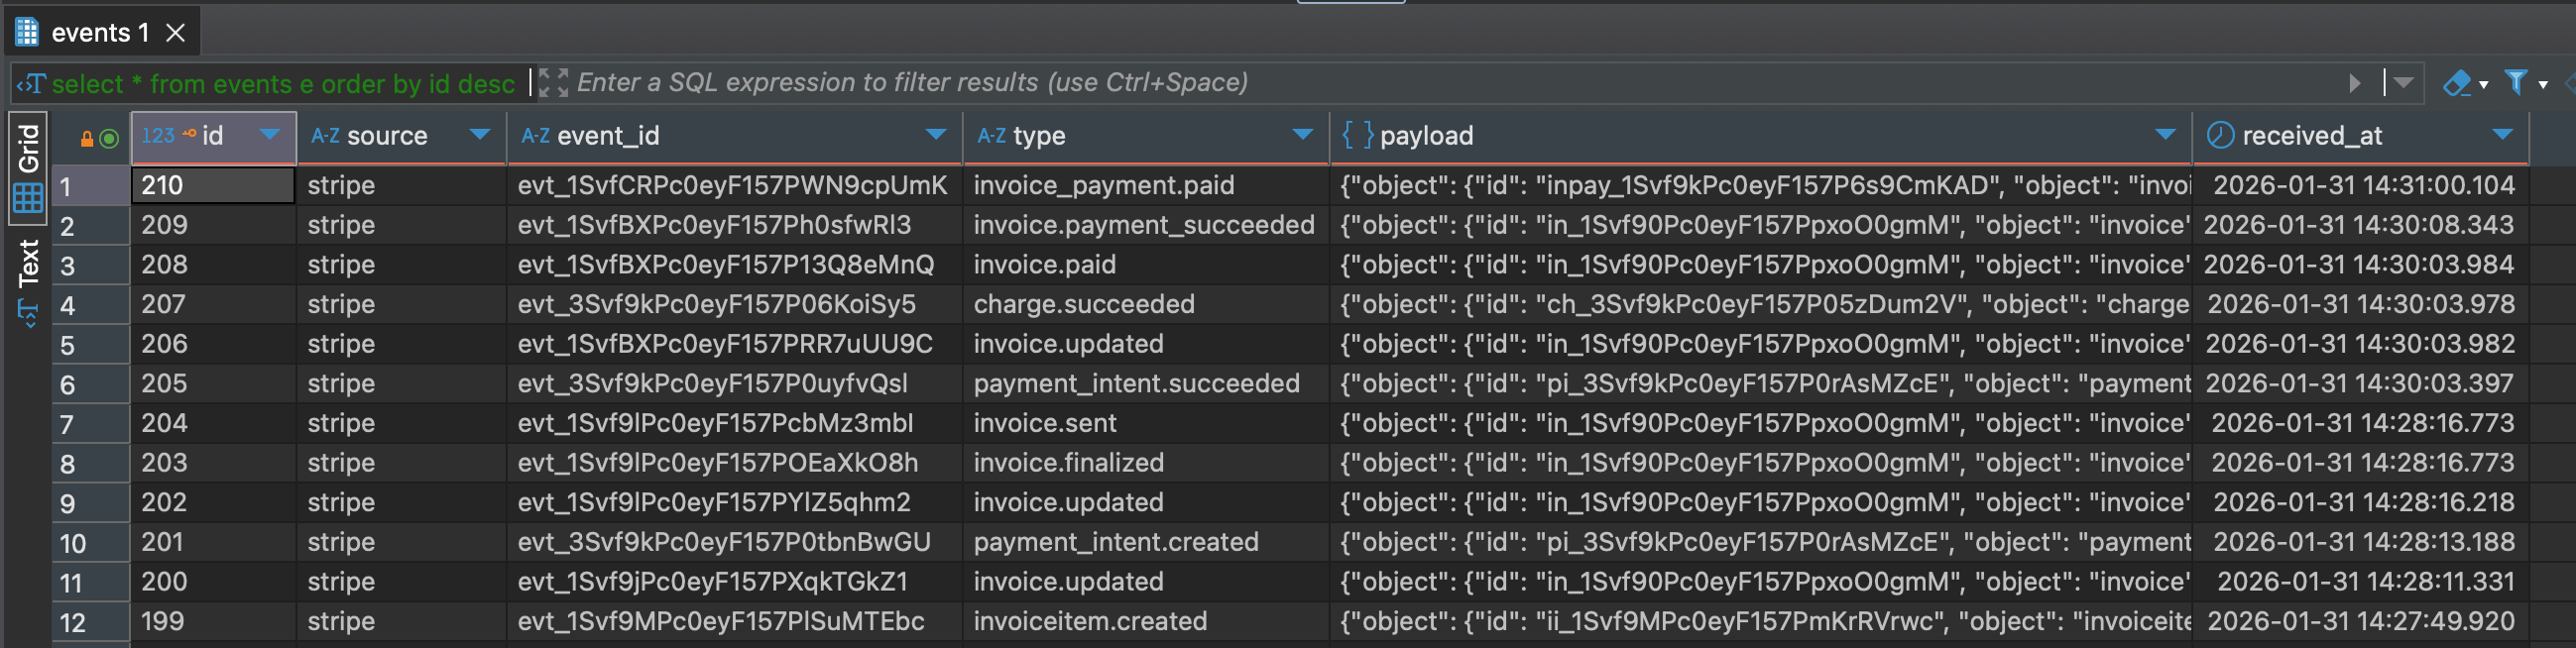
7. Check results in the DB or GET endpoint:
8. Stripe Webhook – Local Development (Forwarding):
For local development and testing, Stripe provides a CLI that allows webhook events to be forwarded directly to a local server.
Installation of stripe-cli:
https://stripe.com/docs/stripe-cli
Check Version after install the CLI
stripe version
stripe login
stripe listen --forward-to http://localhost:8000/api/v1/webhooks/stripe
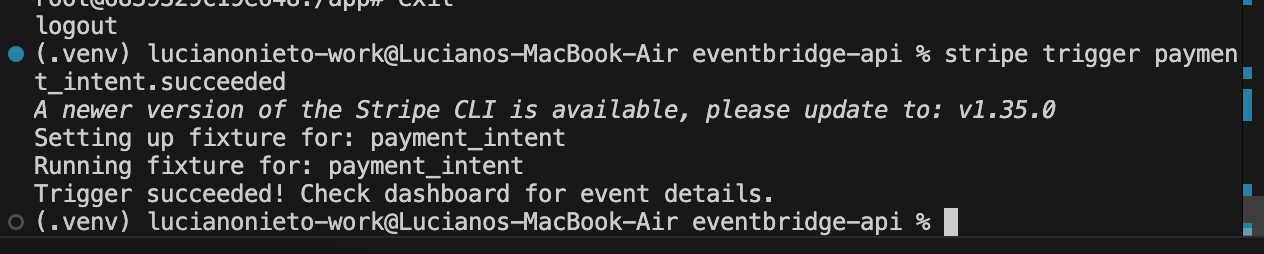
9. Trigger Test Events:
stripe trigger payment_intent.succeeded

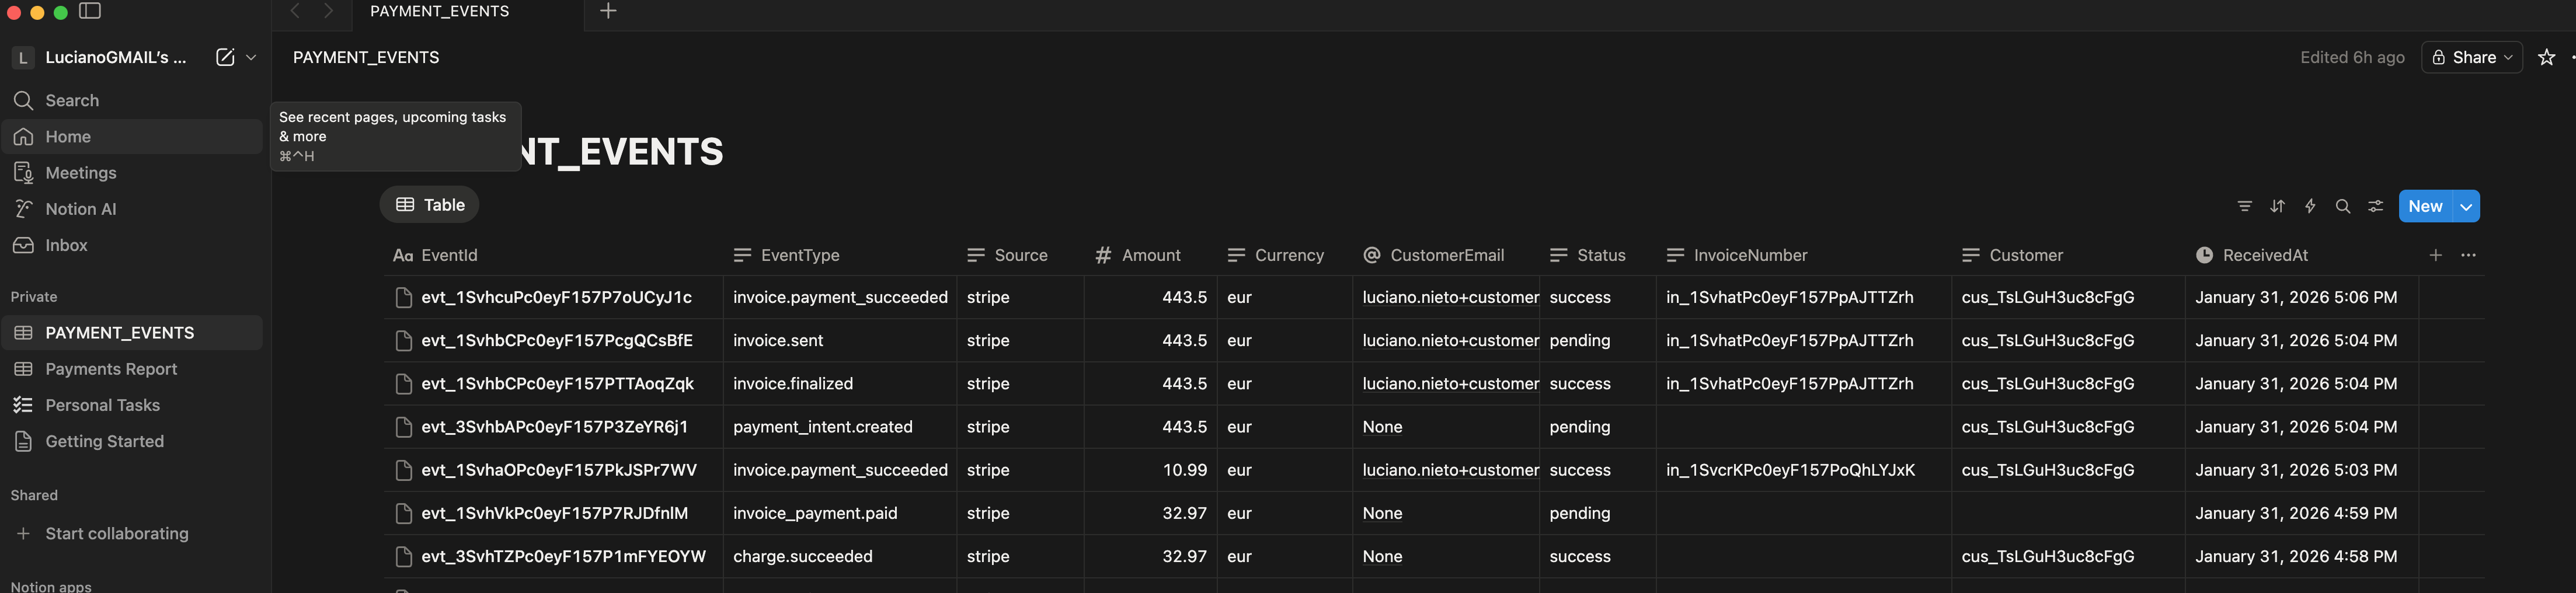
9. Check Results in Notion (Final):
10. Production Mode – Stripe Dashboard Configuration
For “production” deployments, webhook endpoints must be registered directly in the Stripe Dashboard.
Demo:
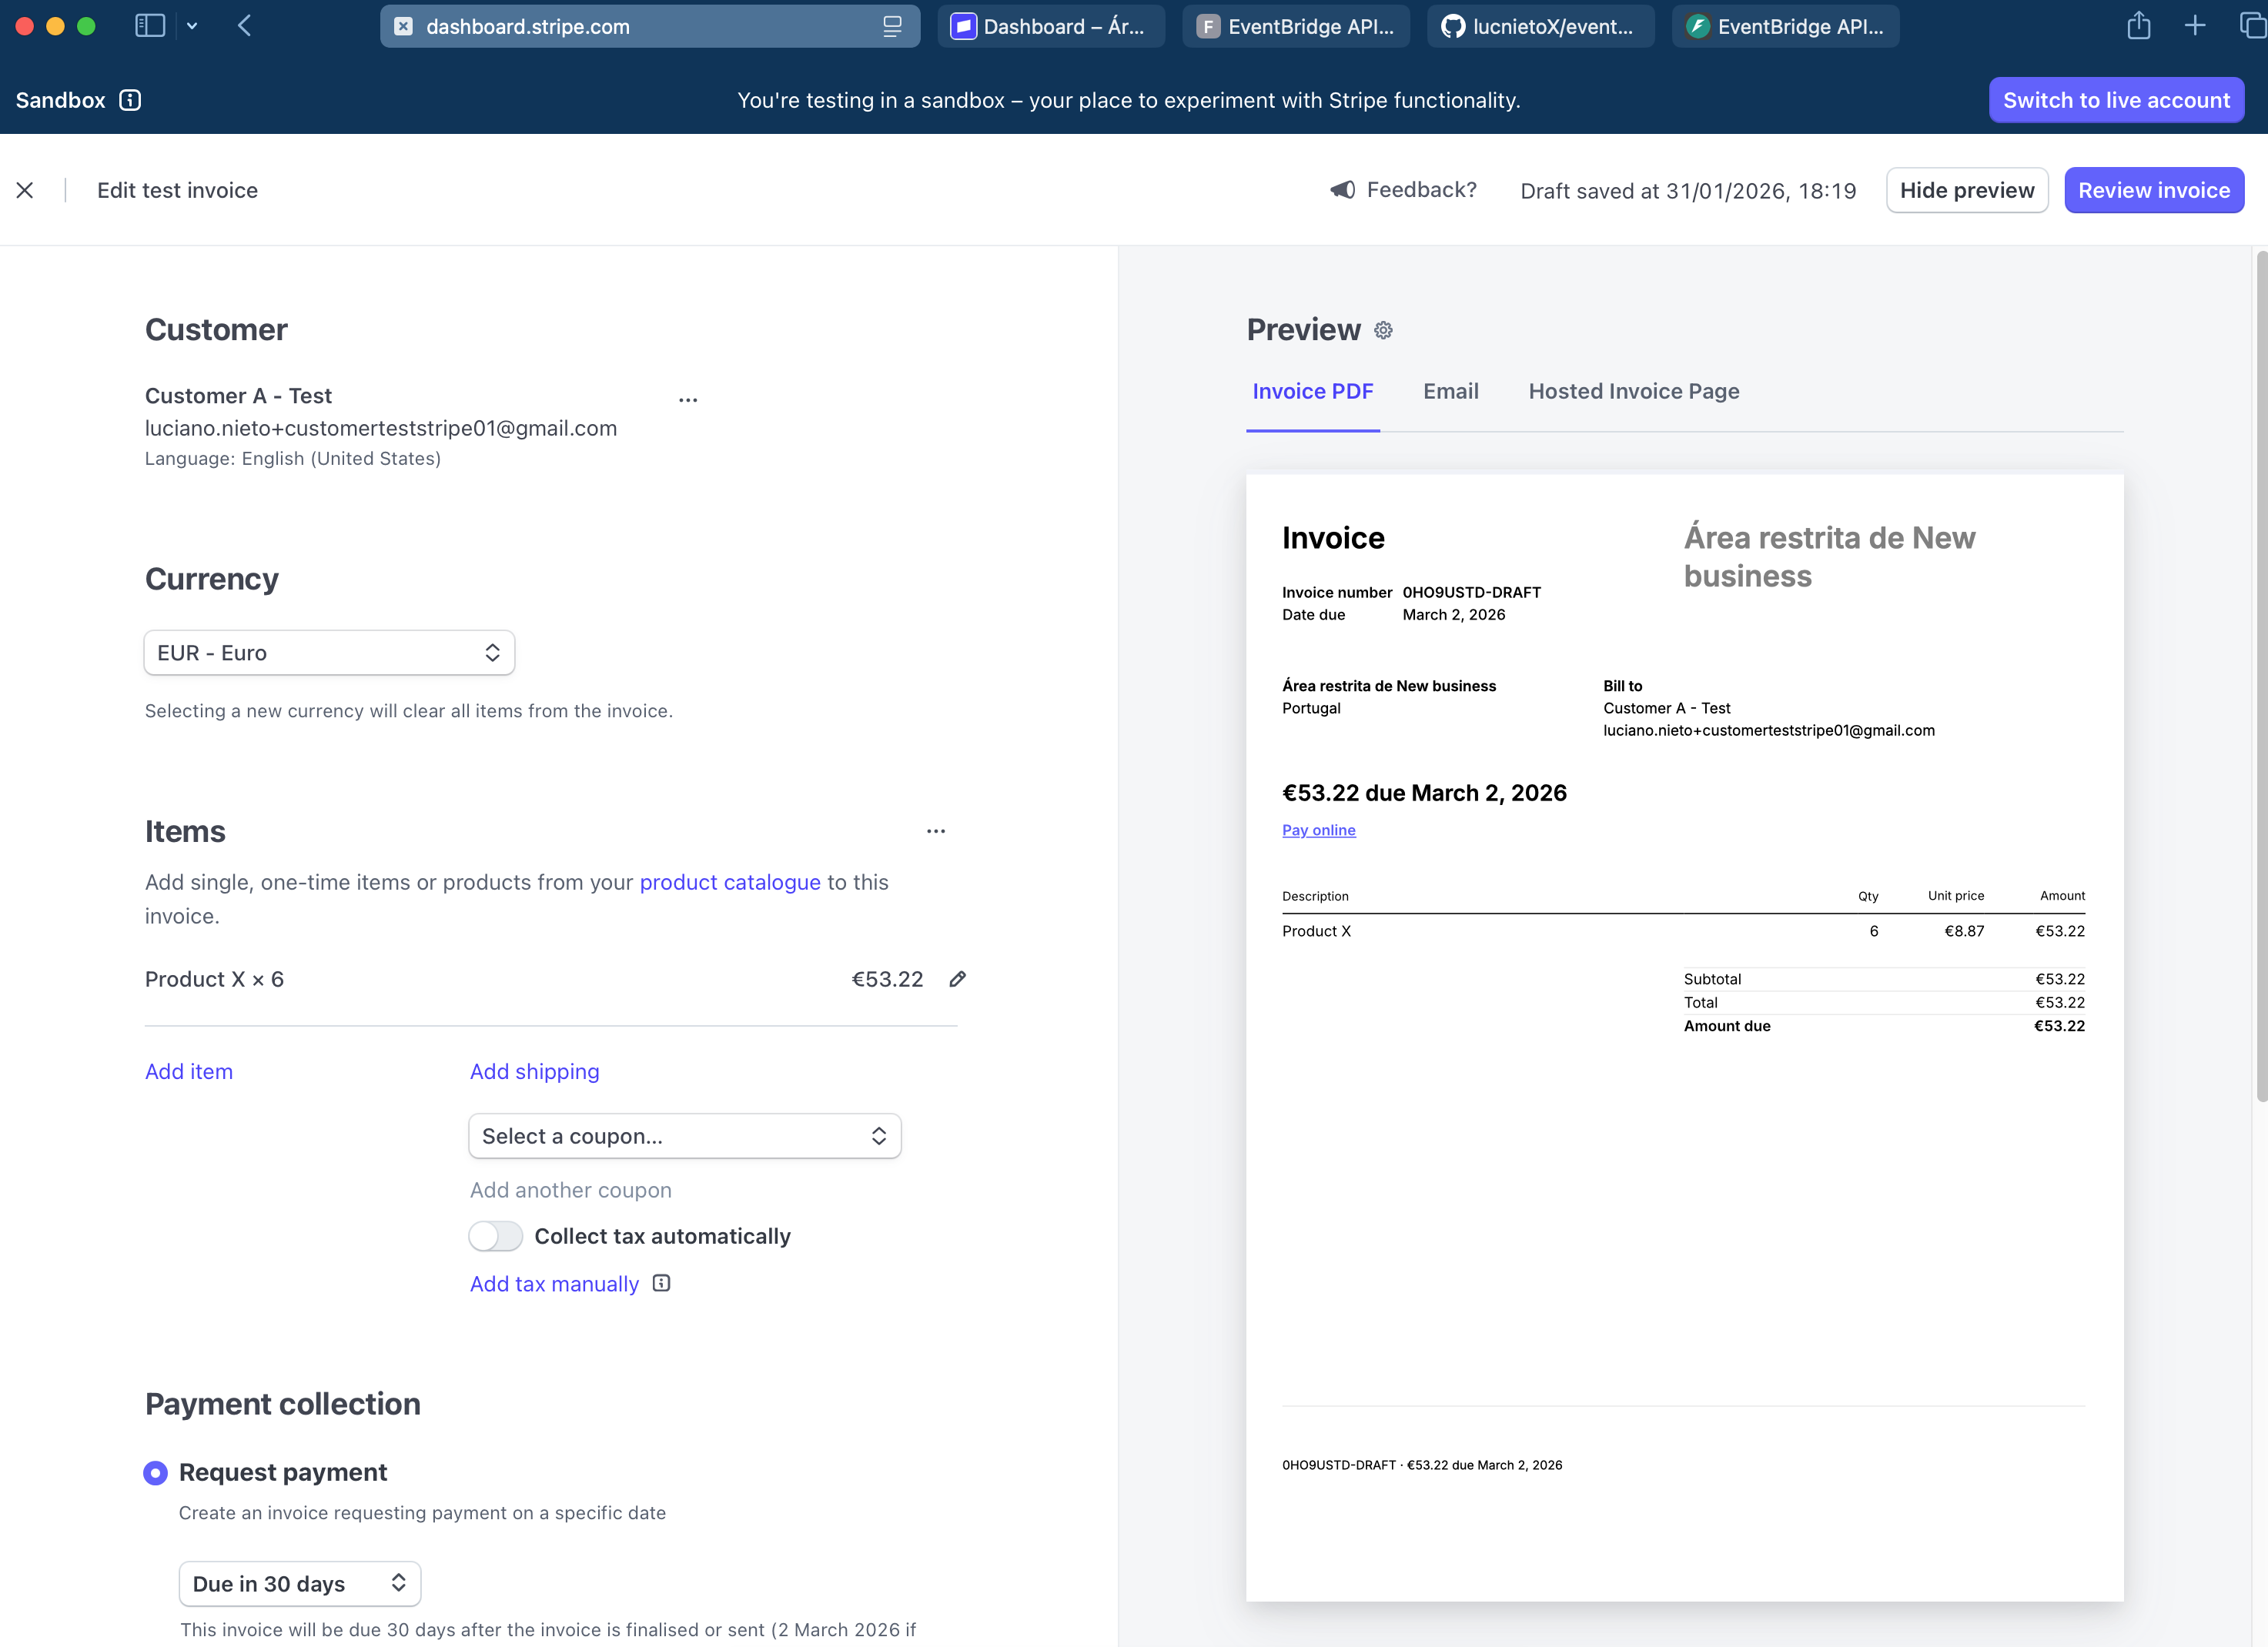
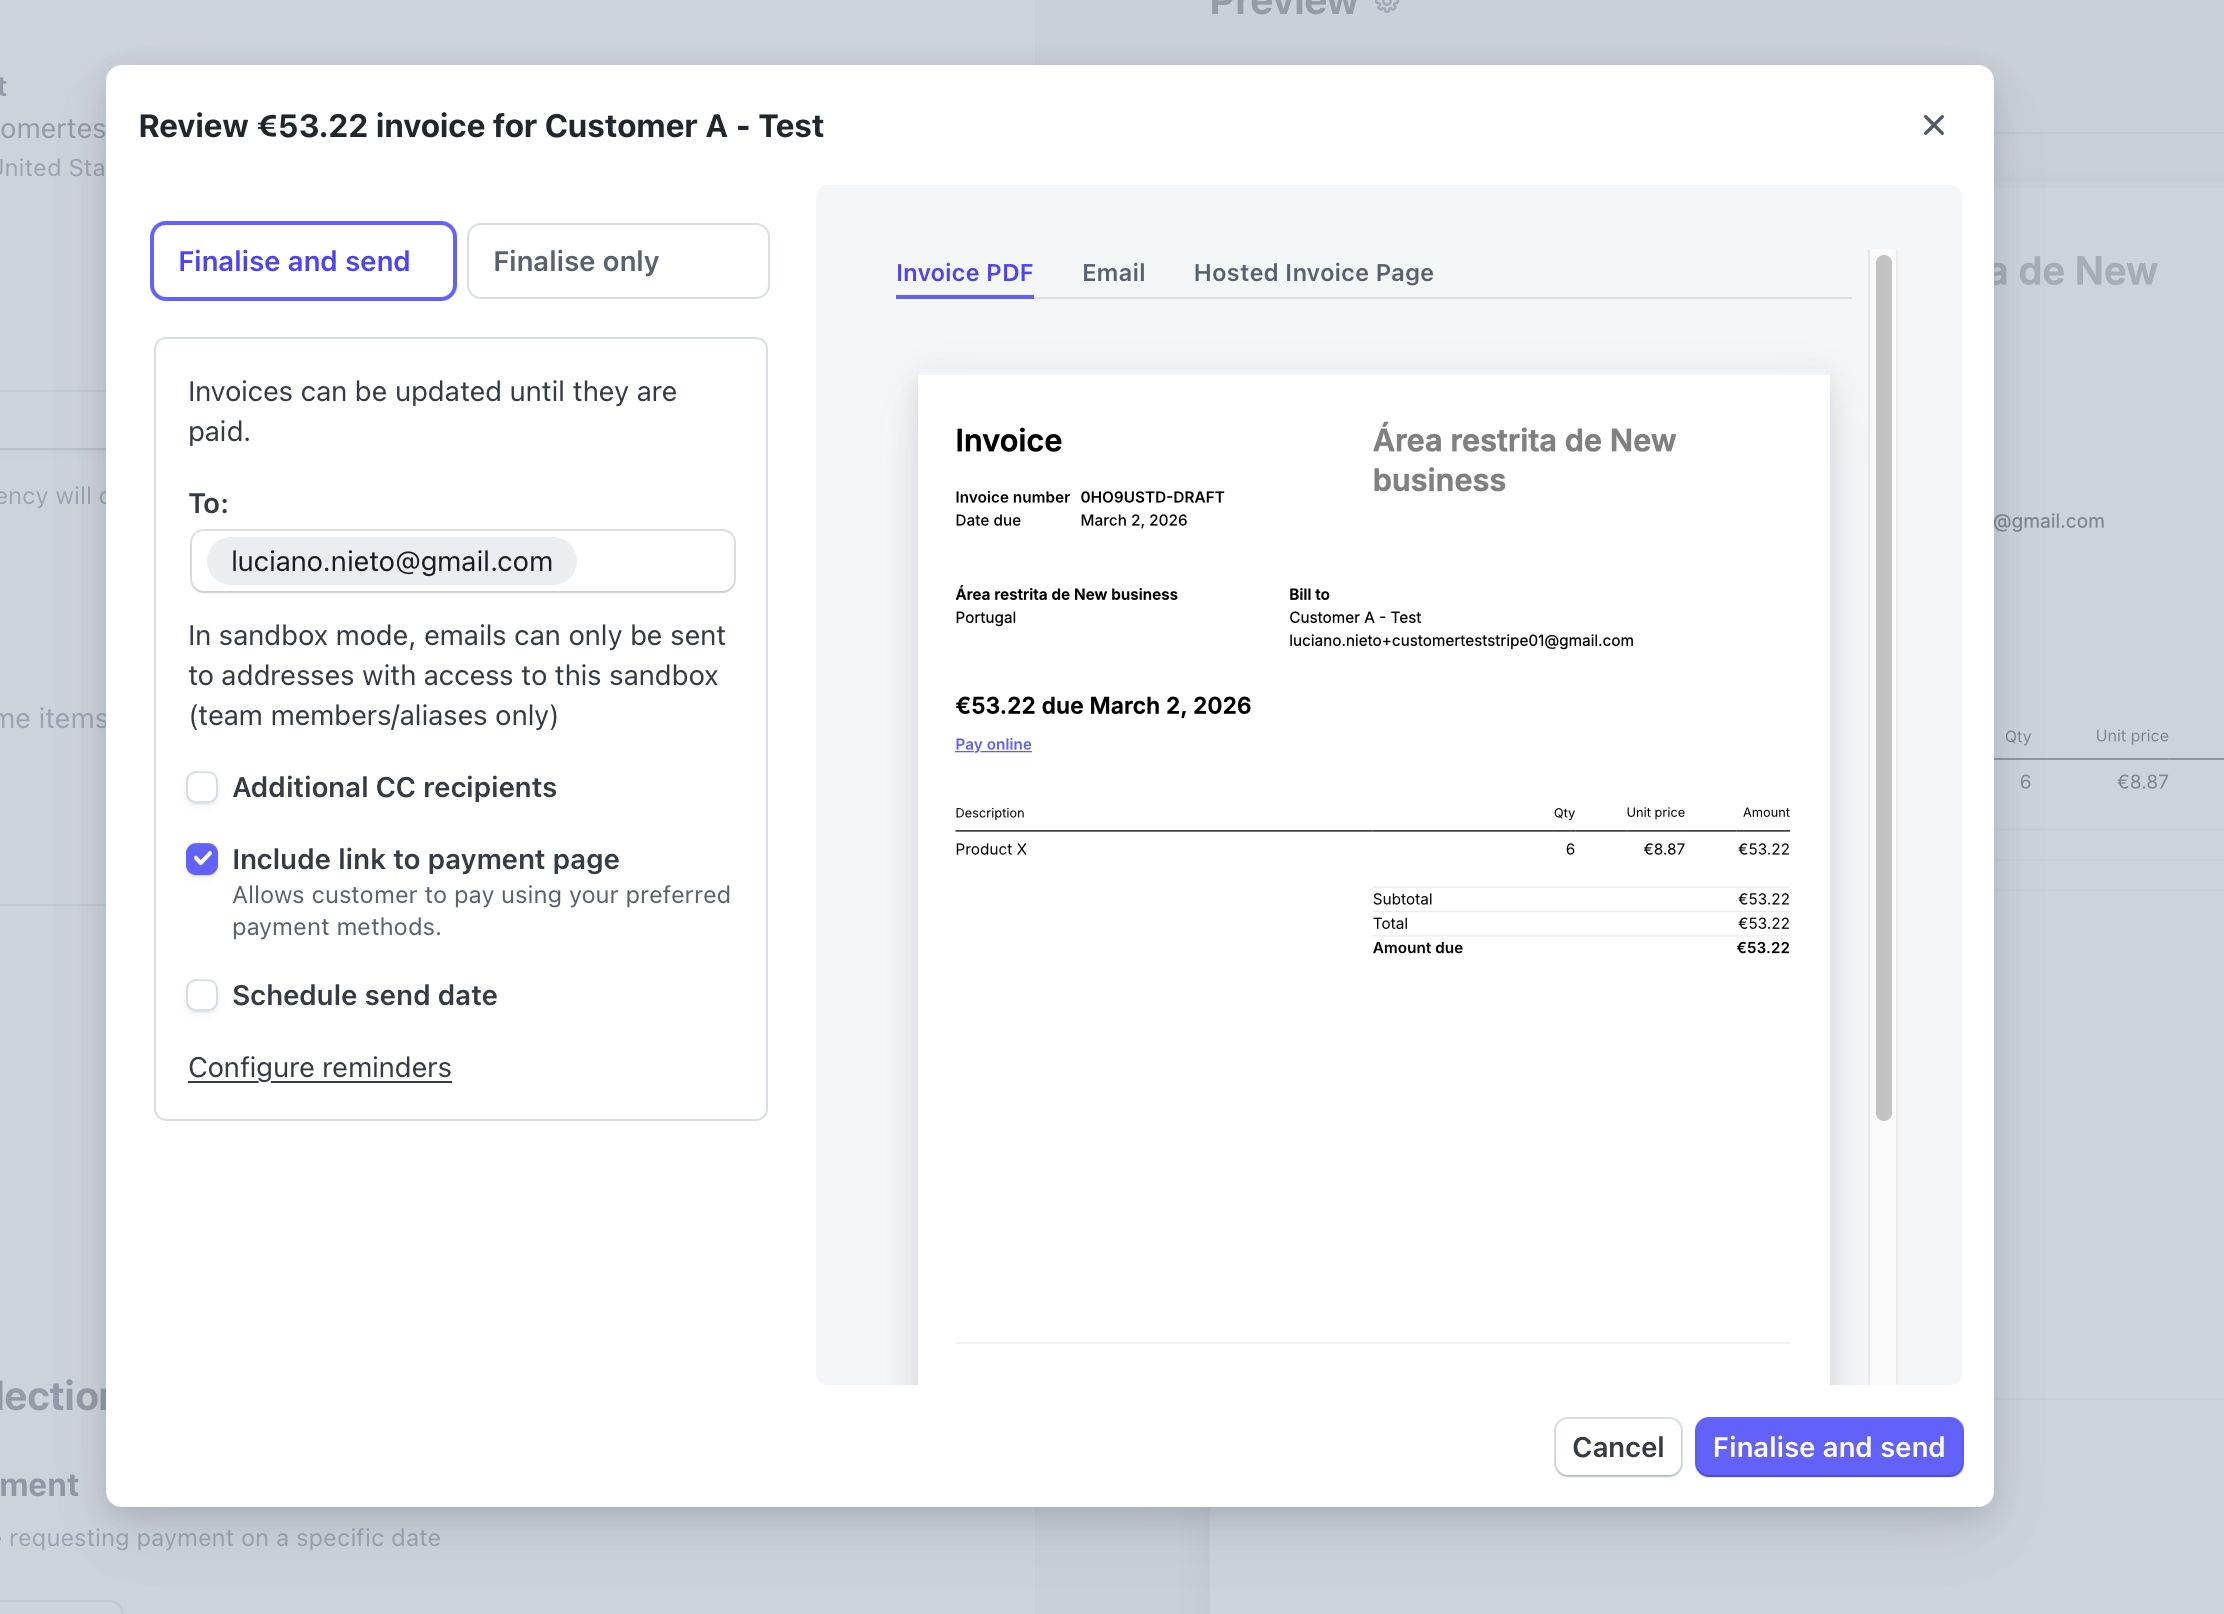
1 . Create Invoice in Stripe
Send
2. Check the Result in Notion (final)

3. Pay the invoice
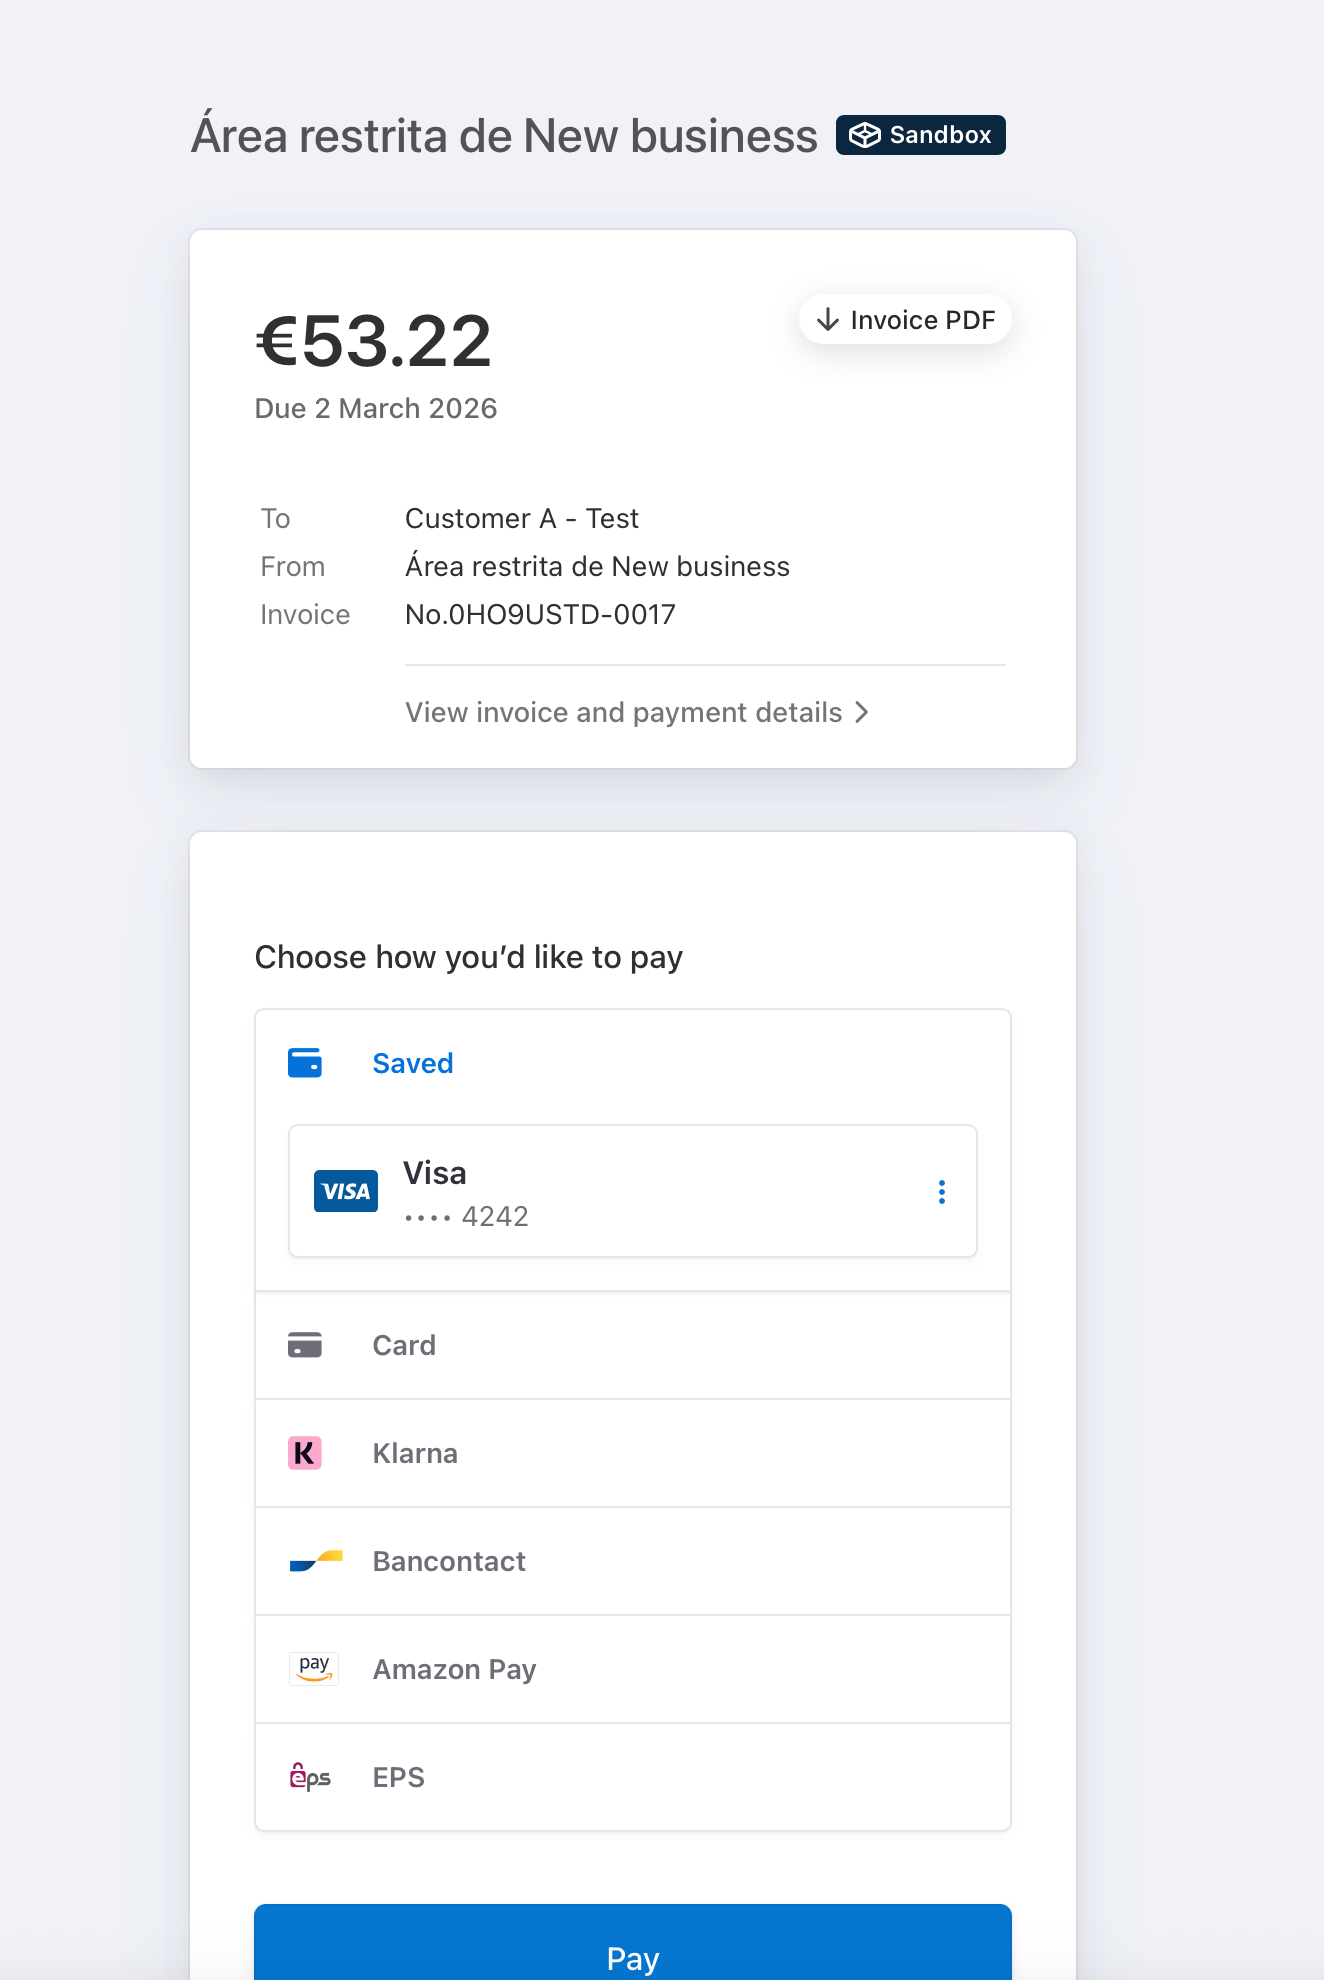
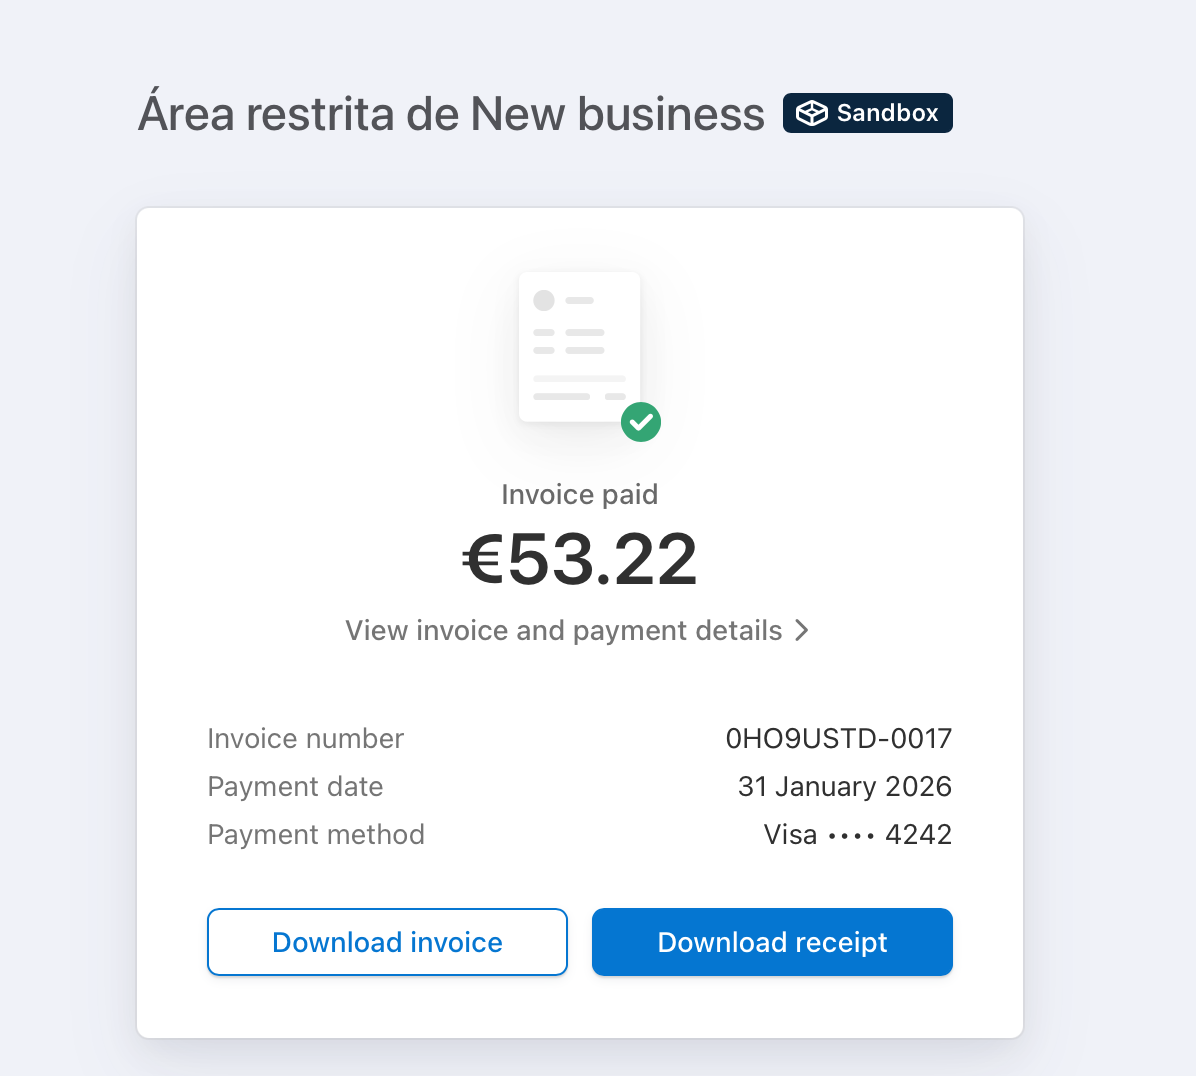
4. Check the Result in Notion (final)

Final Thoughts
This project demonstrates a practical approach to building webhook-driven integrations using FastAPI using production ready approach.
The same architecture can be extended with:
•	retry endpoints.
•	authentication.
•	monitoring and metrics.
•	message brokers.
More
- GitHub Repo here.
- App: https://eventbridge-api.fly.dev/docs (published through Fly.io)